AWT Tutorial
Graphical User Interface
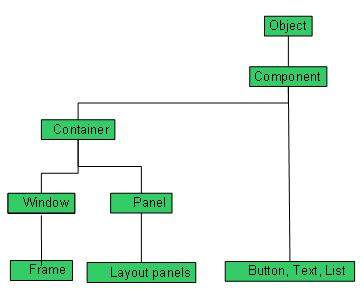
Graphical User Interface (GUI) offers user interaction via some graphical components. For example our underlying Operating System also offers GUI via window,frame,Panel, Button, Textfield, TextArea, Listbox, Combobox, Label, Checkbox etc. These all are known as components. Using these components we can create an interactive user interface for an application.
GUI provides result to end user in response to raised events.GUI is entirely based events. For example clicking over a button, closing a window, opening a window, typing something in a textarea etc. These activities are known as events.GUI makes it easier for the end user to use an application. It also makes them interesting.
Basic Terminologies
| Term | Description |
|---|---|
| Component | Component is an object having a graphical representation that can be displayed on the screen and that can interact with the user. For examples buttons, checkboxes, list and scrollbars of a graphical user interface. |
| Container | Container object is a component that can contain other components.Components added to a container are tracked in a list. The order of the list will define the components' front-to-back stacking order within the container. If no index is specified when adding a component to a container, it will be added to the end of the list. |
| Panel | Panel provides space in which an application can attach any other components, including other panels. |
| Window | Window is a rectangular area which is displayed on the screen. In different window we can execute different program and display different data. Window provide us with multitasking environment. A window must have either a frame, dialog, or another window defined as its owner when it's constructed. |
| Frame | A Frame is a top-level window with a title and a border. The size of the frame includes any area designated for the border. Frame encapsulates window. It and has a title bar, menu bar, borders, and resizing corners. |
| Canvas | Canvas component represents a blank rectangular area of the screen onto which the application can draw. Application can also trap input events from the use from that blank area of Canvas component. |
Examples of GUI based Applications
Following are some of the examples for GUI based applications.
- Automated Teller Machine (ATM)
- Airline Ticketing System
- Information Kiosks at railway stations
- Mobile Applications
- Navigation Systems
Advantages of GUI over CUI
- GUI provides graphical icons to interact while the CUI (Character User Interface) offers the simple text-based interfaces.
- GUI makes the application more entertaining and interesting on the other hand CUI does not.
- GUI offers click and execute environment while in CUI every time we have to enter the command for a task.
- New user can easily interact with graphical user interface by the visual indicators but it is difficult in Character user interface.
- GUI offers a lot of controls of file system and the operating system while in CUI you have to use commands which is difficult to remember.
- Windows concept in GUI allow the user to view, manipulate and control the multiple applications at once while in CUI user can control one task at a time.
- GUI provides multitasking environment so as the CUI also does but CUI does not provide same ease as the GUI do.
- Using GUI it is easier to control and navigate the operating system which becomes very slow in command user interface. GUI can be easily customized.
AWT Environment Setup
This section guides you on how to download and set up Java on your machine. Please follow the following steps to set up the environment.
Java SE is freely available from the link Download Java. So you download a version based on your operating system.
Follow the instructions to download java and run the .exe to install Java on your machine. Once you installed Java on your machine, you would need to set environment variables to point to correct installation directories:
Setting up the path for windows 2000/XP:
Assuming you have installed Java in c:\Program Files\java\jdk directory:
- Right-click on 'My Computer' and select 'Properties'.
- Click on the 'Environment variables' button under the 'Advanced' tab.
- Now alter the 'Path' variable so that it also contains the path to the Java executable. Example, if the path is currently set to 'C:\WINDOWS\SYSTEM32', then change your path to read 'C:\WINDOWS\SYSTEM32;c:\Program Files\java\jdk\bin'.
Setting up the path for windows 95/98/ME:
Assuming you have installed Java in c:\Program Files\java\jdk directory:
- Edit the 'C:\autoexec.bat' file and add the following line at the end:
'SET PATH=%PATH%;C:\Program Files\java\jdk\bin'
Setting up the path for Linux, UNIX, Solaris, FreeBSD:
Environment variable PATH should be set to point to where the java binaries have been installed. Refer to your shell documentation if you have trouble doing this.
Example, if you use bash as your shell, then you would add the following line to the end of your '.bashrc: export PATH=/path/to/java:$PATH'
Popular Java Editors:
To write your java programs you will need a text editor. There are even more sophisticated IDE available in the market. But for now, you can consider one of the following:
- Notepad : On Windows machine you can use any simple text editor like Notepad (Recommended for this tutorial), TextPad.
- Netbeans :is a Java IDE that is open source and free which can be downloaded from http://www.netbeans.org/index.html.
- Eclipse : is also a java IDE developed by the eclipse open source community and can be downloaded from http://www.eclipse.org/
AWT Controls
Every user interface considers the following three main aspects:
- UI elements : Thes are the core visual elements the user eventually sees and interacts with. GWT provides a huge list of widely used and common elements varying from basic to complex which we will cover in this tutorial.
- Layouts: They define how UI elements should be organized on the screen and provide a final look and feel to the GUI (Graphical User Interface). This part will be covered in Layout chapter.
- Behavior: These are events which occur when the user interacts with UI elements. This part will be covered in Event Handling chapter.
Every AWT controls inherits properties from Component class.
| Sr. No. | Control & Description |
|---|---|
| 1 |
A Component is an abstract super class for GUI controls and it represents an object with graphical representation.
|
AWT UI Elements:
Following is the list of commonly used controls while designed GUI using AWT.
| Sr. No. | Control & Description |
|---|---|
| 1 |
A Label object is a component for placing text in a container.
|
| 2 |
This class creates a labeled button.
|
| 3 |
A check box is a graphical component that can be in either an on (true) or off (false) state.
|
| 4 |
The CheckboxGroup class is used to group the set of checkbox.
|
| 5 |
The List component presents the user with a scrolling list of text items.
|
| 6 |
A TextField object is a text component that allows for the editing of a single line of text.
|
| 7 |
A TextArea object is a text component that allows for the editing of a multiple lines of text.
|
| 8 |
A Choice control is used to show pop up menu of choices. Selected choice is shown on the top of the menu.
|
| 9 |
A Canvas control represents a rectangular area where application can draw something or can receive inputs created by user.
|
| 10 |
An Image control is superclass for all image classes representing graphical images.
|
| 11 |
A Scrollbar control represents a scroll bar component in order to enable user to select from range of values.
|
| 12 |
A Dialog control represents a top-level window with a title and a border used to take some form of input from the user.
|
| 13 |
A FileDialog control represents a dialog window from which the user can select a file.
|
AWT Event Handling
What is an Event?
Change in the state of an object is known as event i.e. event describes the change in state of source. Events are generated as result of user interaction with the graphical user interface components. For example, clicking on a button, moving the mouse, entering a character through keyboard,selecting an item from list, scrolling the page are the activities that causes an event to happen.
Types of Event
The events can be broadly classified into two categories:
- Foreground Events - Those events which require the direct interaction of user.They are generated as consequences of a person interacting with the graphical components in Graphical User Interface. For example, clicking on a button, moving the mouse, entering a character through keyboard,selecting an item from list, scrolling the page etc.
- Background Events - Those events that require the interaction of end user are known as background events. Operating system interrupts, hardware or software failure, timer expires, an operation completion are the example of background events.
What is Event Handling?
Event Handling is the mechanism that controls the event and decides what should happen if an event occurs. This mechanism have the code which is known as event handler that is executed when an event occurs. Java Uses the Delegation Event Model to handle the events. This model defines the standard mechanism to generate and handle the events.Let's have a brief introduction to this model.
The Delegation Event Model has the following key participants namely:
- Source - The source is an object on which event occurs. Source is responsible for providing information of the occurred event to it's handler. Java provide as with classes for source object.
- Listener - It is also known as event handler.Listener is responsible for generating response to an event. From java implementation point of view the listener is also an object. Listener waits until it receives an event. Once the event is received , the listener process the event an then returns.
The benefit of this approach is that the user interface logic is completely separated from the logic that generates the event. The user interface element is able to delegate the processing of an event to the separate piece of code. In this model ,Listener needs to be registered with the source object so that the listener can receive the event notification. This is an efficient way of handling the event because the event notifications are sent only to those listener that want to receive them.
Steps involved in event handling
- The User clicks the button and the event is generated.
- Now the object of concerned event class is created automatically and information about the source and the event get populated with in same object.
- Event object is forwarded to the method of registered listener class.
- the method is now get executed and returns.
Points to remember about listener
- In order to design a listener class we have to develop some listener interfaces.These Listener interfaces forecast some public abstract callback methods which must be implemented by the listener class.
- If you do not implement the any if the predefined interfaces then your class can not act as a listener class for a source object.
Callback Methods
These are the methods that are provided by API provider and are defined by the application programmer and invoked by the application developer. Here the callback methods represents an event method. In response to an event java jre will fire callback method. All such callback methods are provided in listener interfaces.
If a component wants some listener will listen to it's events the the source must register itself to the listener.
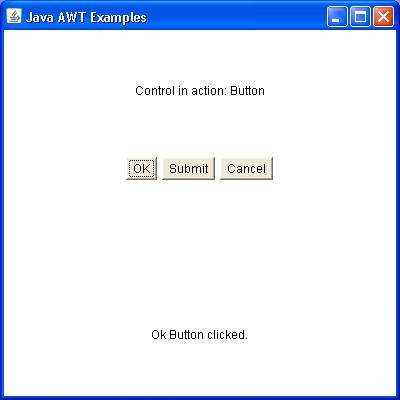
Event Handling Example
Create the following java program using any editor of your choice in say D:/ > AWT > com > only4programmers> gui >
AwtControlDemo.javapackage com.only4programmers.gui; import java.awt.*; import java.awt.event.*; public class AwtControlDemo { private Frame mainFrame; private Label headerLabel; private Label statusLabel; private Panel controlPanel; public AwtControlDemo(){ prepareGUI(); } public static void main(String[] args){ AwtControlDemo awtControlDemo = new AwtControlDemo(); awtControlDemo.showEventDemo(); } private void prepareGUI(){ mainFrame = new Frame("Java AWT Examples"); mainFrame.setSize(400,400); mainFrame.setLayout(new GridLayout(3, 1)); mainFrame.addWindowListener(new WindowAdapter() { public void windowClosing(WindowEvent windowEvent){ System.exit(0); } }); headerLabel = new Label(); headerLabel.setAlignment(Label.CENTER); statusLabel = new Label(); statusLabel.setAlignment(Label.CENTER); statusLabel.setSize(350,100); controlPanel = new Panel(); controlPanel.setLayout(new FlowLayout()); mainFrame.add(headerLabel); mainFrame.add(controlPanel); mainFrame.add(statusLabel); mainFrame.setVisible(true); } private void showEventDemo(){ headerLabel.setText("Control in action: Button"); Button okButton = new Button("OK"); Button submitButton = new Button("Submit"); Button cancelButton = new Button("Cancel"); okButton.setActionCommand("OK"); submitButton.setActionCommand("Submit"); cancelButton.setActionCommand("Cancel"); okButton.addActionListener(new ButtonClickListener()); submitButton.addActionListener(new ButtonClickListener()); cancelButton.addActionListener(new ButtonClickListener()); controlPanel.add(okButton); controlPanel.add(submitButton); controlPanel.add(cancelButton); mainFrame.setVisible(true); } private class ButtonClickListener implements ActionListener{ public void actionPerformed(ActionEvent e) { String command = e.getActionCommand(); if( command.equals( "OK" )) { statusLabel.setText("Ok Button clicked."); } else if( command.equals( "Submit" ) ) { statusLabel.setText("Submit Button clicked."); } else { statusLabel.setText("Cancel Button clicked."); } } } }
Compile the program using command prompt. Go to D:/ > AWT and type the following command.
D:\AWT>javac com\only4programmers\gui\AwtControlDemo.java
If no error comes that means compilation is successful. Run the program using following command.
D:\AWT>java com.only4programmers.gui.AwtControlDemo
Verify the following output
AWT Event Classes
- The Event classes represent the event. Java provides us various Event classes but we will discuss those which are more frequently used.
EventObject class
It is the root class from which all event state objects shall be derived. All Events are constructed with a reference to the object, the source, that is logically deemed to be the object upon which the Event in question initially occurred upon.This class is defined in java.util package.Class declaration
Following is the declaration for java.util.EventObject class:public class EventObject extends Object implements Serializable
Field
Following are the fields for java.util.EventObject class:- protected Object source -- The object on which the Event initially occurred.
Class constructors
S.N. Constructor & Description 1 EventObject(Object source)Constructs a prototypical Event.Class methods
S.N. Method & Description 1 Object getSource()The object on which the Event initially occurred.2 String toString()Returns a String representation of this EventObject.Methods inherited
This class inherits methods from the following classes:- java.lang.Object
AWT Event Classes:
Following is the list of commonly used event classes.Sr. No. Control & Description 1 It is the root event class for all AWT events. This class and its subclasses supercede the original java.awt.Event class.2 The ActionEvent is generated when button is clicked or the item of a list is double clicked.3 The InputEvent class is root event class for all component-level input events.4 On entering the character the Key event is generated.5 This event indicates a mouse action occurred in a component.6 The object of this class represents the text events.7 The object of this class represents the change in state of a window.8 The object of this class represents the adjustment event emitted by Adjustable objects.9 The object of this class represents the change in state of a window.10 The object of this class represents the change in state of a window.11 The object of this class represents the change in state of a window.12 The object of this class represents the change in state of a window.
AWT Event Listeners
The Event listener represent the interfaces responsible to handle events. Java provides us various Event listener classes but we will discuss those which are more frequently used. Every method of an event listener method has a single argument as an object which is subclass of EventObject class. For example, mouse event listener methods will accept instance of MouseEvent, where MouseEvent derives from EventObject.
EventListner interface
It is a marker interface which every listener interface has to extend.This class is defined in java.util package.
Class declaration
Following is the declaration for java.util.EventListener interface:
public interface EventListener
AWT Event Listener Interfaces:
Following is the list of commonly used event listeners.
| Sr. No. | Control & Description |
|---|---|
| 1 |
This interface is used for receiving the action events.
|
| 2 |
This interface is used for receiving the component events.
|
| 3 |
This interface is used for receiving the item events.
|
| 4 |
This interface is used for receiving the key events.
|
| 5 |
This interface is used for receiving the mouse events.
|
| 6 |
This interface is used for receiving the text events.
|
| 7 |
This interface is used for receiving the window events.
|
| 8 |
This interface is used for receiving the adjusmtent events.
|
| 9 |
This interface is used for receiving the container events.
|
| 10 |
This interface is used for receiving the mouse motion events.
|
| 11 |
This interface is used for receiving the focus events.
|
AWT Event Adapters
Adapters are abstract classes for receiving various events. The methods in these classes are empty. These classes exists as convenience for creating listener objects.
AWT Adapters:
Following is the list of commonly used adapters while listening GUI events in AWT.
| Sr. No. | Adapter & Description |
|---|---|
| 1 |
An abstract adapter class for receiving focus events.
|
| 2 |
An abstract adapter class for receiving key events.
|
| 3 |
An abstract adapter class for receiving mouse events.
|
| 4 |
An abstract adapter class for receiving mouse motion events.
|
| 5 |
An abstract adapter class for receiving window events.
|
AWT Layouts
Introduction
Layout means the arrangement of components within the container. In other way we can say that placing the components at a particular position within the container. The task of layouting the controls is done automatically by the Layout Manager.
Layout Manager
The layout manager automatically positions all the components within the container. If we do not use layout manager then also the components are positioned by the default layout manager. It is possible to layout the controls by hand but it becomes very difficult because of the following two reasons.
- It is very tedious to handle a large number of controls within the container.
- Oftenly the width and height information of a component is not given when we need to arrange them.
Java provide us with various layout manager to position the controls. The properties like size,shape and arrangement varies from one layout manager to other layout manager. When the size of the applet or the application window changes the size, shape and arrangement of the components also changes in response i.e. the layout managers adapt to the dimensions of appletviewer or the application window.
The layout manager is associated with every Container object. Each layout manager is an object of the class that implements the LayoutManager interface.
Following are the interfaces defining functionalities of Layout Managers.
| Sr. No. | Interface & Description |
|---|---|
| 1 |
The LayoutManager interface declares those methods which need to be implemented by the class whose object will act as a layout manager.
|
| 2 |
The LayoutManager2 is the sub-interface of the LayoutManager.This interface is for those classes that know how to layout containers based on layout constraint object.
|
AWT Layout Manager Classes:
Following is the list of commonly used controls while designed GUI using AWT.
| Sr. No. | LayoutManager & Description |
|---|---|
| 1 |
The borderlayout arranges the components to fit in the five regions: east, west, north, south and center.
|
| 2 |
The CardLayout object treats each component in the container as a card. Only one card is visible at a time.
|
| 3 |
The FlowLayout is the default layout.It layouts the components in a directional flow.
|
| 4 |
The GridLayout manages the components in form of a rectangular grid.
|
| 5 |
This is the most flexible layout manager class.The object of GridBagLayout aligns the component vertically,horizontally or along their baseline without requiring the components of same size.
|
AWT Containers
Containers are integral part of AWT GUI components. A container provides a space where a component can be located. A Container in AWT is a component itself and it adds the capability to add component to itself. Following are noticable points to be considered.
- Sub classes of Container are called as Containter. For example Panel, Frame and Window.
- Container can add only Component to itself.
- A default layout is present in each container which can be overridden using setLayout method.
| Sr. No. | Container & Description |
|---|---|
| 1 |
It is a generic container object which can contain other AWT components.
|
AWT UI Elements:
Following is the list of commonly used containers while designed GUI using AWT.
| Sr. No. | Container & Description |
|---|---|
| 1 |
Panel is the simplest container. It provides space in which any other component can be placed, including other panels.
|
| 2 |
A Frame is a top-level window with a title and a border
|
| 3 |
A Window object is a top-level window with no borders and no menubar.
|
AWT Menu Classes
As we know that every top-level window has a menu bar associated with it. This menu bar consist of various menu choices available to the end user. Further each choice contains list of options which is called drop down menus. Menu and MenuItem controls are subclass of MenuComponent class.
Menu Hiearchy
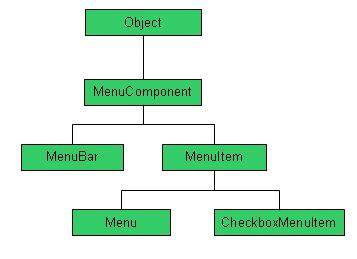
Menu Controls
| Sr. No. | Control & Description |
|---|---|
| 1 |
It is the top level class for all menu related controls.
|
| 2 |
The MenuBar object is associated with the top-level window.
|
| 3 |
The items in the menu must belong to the MenuItem or any of its subclass.
|
| 4 |
|
| 5 |
CheckboxMenuItem is subclass of MenuItem.
|
| 6 |
PopupMenu can be dynamically popped up at a specified position within a component.
|
AWT Graphics Classes
Graphics controls allows application to draw onto the component or on image.
Graphics Controls
| Sr. No. | Control & Description |
|---|---|
| 1 |
It is the top level abstract class for all graphics contexts.
|
| 2 |
It is a subclass of Graphics class and provides more sophisticated control over geometry, coordinate transformations, color management, and text layout.
|
| 3 |
Arc2D is the abstract superclass for all objects that store a 2D arc defined by a framing rectangle, start angle, angular extent (length of the arc), and a closure type (OPEN, CHORD, or PIE).
|
| 4 |
The CubicCurve2D class is the abstract superclass fpr all objects which store a 2D cubic curve segment and it defines a cubic parametric curve segment in (x,y) coordinate space.
|
| 5 |
The Ellipse2D is the abstract superclass for all objects which store a 2D ellipse and it describes an ellipse that is defined by a framing rectangle.
|
| 6 |
The Rectangle2D class is an abstract superclass for all objects that store a 2D rectangle and it describes a rectangle defined by a location (x,y) and dimension (w x h).
|
| 7 |
The QuadCurve2D class is an abstract superclass for all objects that store a 2D quadratic curve segment and it describes a quadratic parametric curve segment in (x,y) coordinate space.
|
| 8 |
This Line2D represents a line segment in (x,y) coordinate space.
|
| 9 |
The Font class represents fonts, which are used to render text in a visible way.
|
| 10 |
The Color class is used encapsulate colors in the default sRGB color space or colors in arbitrary color spaces identified by a ColorSpace.
|
| 11 |
The BasicStroke class defines a basic set of rendering attributes for the outlines of graphics primitives, which are rendered with a Graphics2D object that has its Stroke attribute set to this BasicStroke.
|
No comments:
Post a Comment